Your website's Referral Form is a dedicated resource with its own features and automation schedule. Managed via Yabber and an Elementor block or shortcode, it may be applied anywhere on your website. It is expected that the form will be integral to your formalised referral, partner, and EDGE post-settlement/repricing programs.
You will find the 'Referral Form' menu by selecting the 'FORMS' option in the 'Website' module.
Pictured: You will find the 'Referral Form' menu by selecting the 'FORMS' option in the 'Website' module. The 'Referral Form' is listed within its own menu with a large number of form options.
The form integrates with the partner module, and the type of integration is described shortly.
The Result
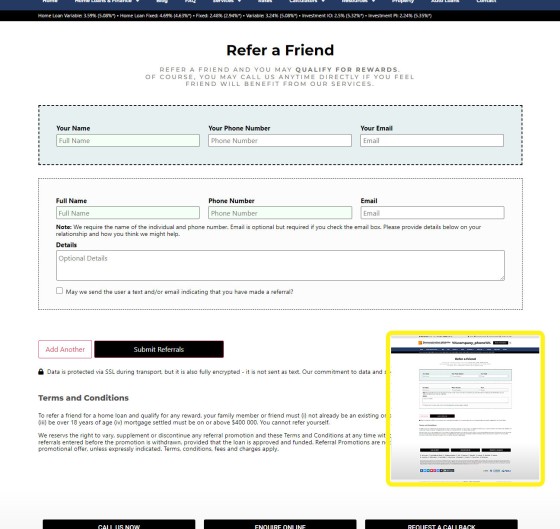
The result of a basic referral form with no custom fields, no default styling, and no partner integration, is shown below. To add a new referral field, your user will select the 'Add Another' button, and to remove a record they'll use the 'Remove' button.
Pictured: The result of a basic referral form with no custom fields, no default styling, and no partner integration, is shown below. To add a new referral field, your user will select the 'Add Another' button, and to remove a record they'll use the 'Remove' button.
When submitted, results are sent to Yabber and archived in the Referral table, a notification email is sent to the broker, and an option email/SMS is sent to the referred client. The referring client will also receive an email.
The form is usually placed on a page with Elementor, although shortcode may be used.
Getting Started
Before creating a form, you should create the emails and SMS required for the assigned automation. Complete the following tasks:
- Referred Email. Create the email that will optionally be sent to those that are referred to you via the form. This email is created as an 'Admin Email Template'. Ensure you assign the email to the category of 'Referral Form' (or similar) with an aptly named reference title.
- Referrer Email. Create an email that will be sent to the individual that made the referral (details of those clients referred will automatically be included). This email is created as an 'Admin Email Template'. Ensure you assign the email to the category of 'Referral Form' (or similar) with an aptly named reference title.
- Referred SMS. Create a text message that will optionally be sent to those that were referred to you by your client. This SMS is created as an 'SMS Template'. Ensure you assign the email to the category of 'Referral Form' (or similar) with an aptly named reference title.
Terms and Conditions. The Referral Form will include a disclaimer. This is created as a 'Block', so we're required to navigate to the 'Block Module' and create the required disclaimer.
Terms and Conditions: A suggested boilerplate for the Terms, Conditions, and Disclaimer, is as follows (under teh title of 'Terms and Conditions'. "To refer a friend for a home loan and qualify for any reward, your family member or friend must (i) not already be an existing or previous client; (ii) be an Australian resident; and (iii) be over 18 years of age (iv) mortgage settled must be on or above $400 000. You cannot refer yourself. We reserve the right to vary, supplement or discontinue any referral promotion and these Terms and Conditions at any time without prior notice. If withdrawn, we will honour all referrals entered before the promotion is withdrawn, provided that the loan is approved and funded. Referral Promotions are not applicable in conjunction with any other promotional offer, unless expressly indicated. Terms, conditions, fees and charges apply."
If an incentive program is assigned to the referral, you should include full qualifying details.
The reason for including the Terms as a Block should be clear: we may update the disclaimer block for any forms or all types globally without editing any single asset, and without having to log into our website.
Understanding Styles and Profiles
Each form will be assigned a 'Style' and a 'Profile'. A style compromises the array of colours applied to the form, while the profile includes the text assigned to each form field, the automation schedule, and the disclaimer. A single style and Profile should initially be created even if you use default values - this enables you to apply global updates in the future. So, while we're introducing the form creation first, you should create an automation schedule, style and profile before anything else.
When you send data to your website, you will be required to create a 'WEBSITE PROFILE', which is a combination of a style and a profile (all your created profiles are updated at the same time). More on this later.
■ ■ ■
Step 1: Create Automation Schedule
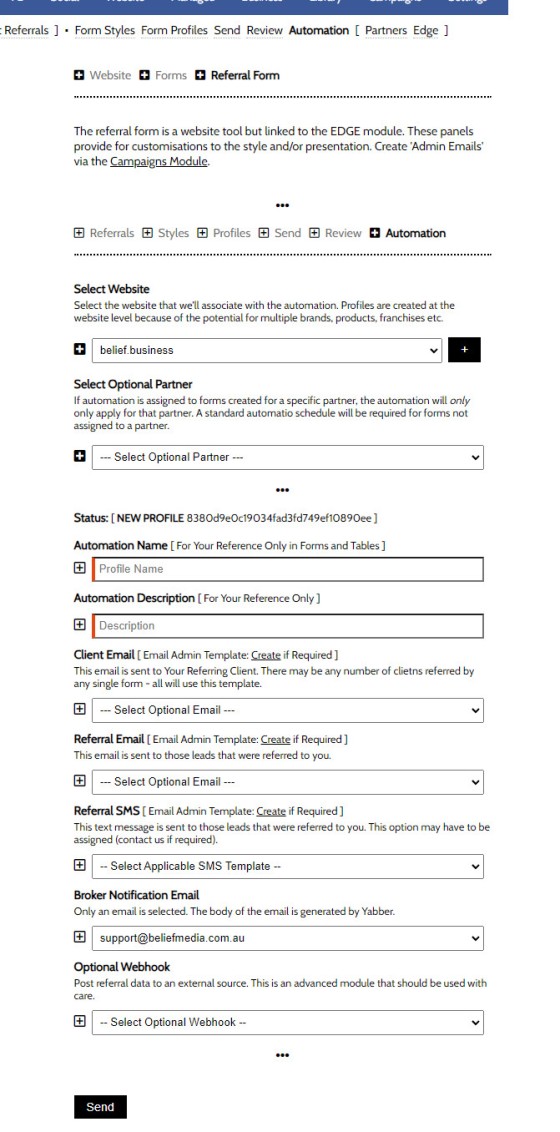
A single (default) automation schedule should be created before you continue. When we come back to the 'Profile' shortly the automation will have to be assigned, so it's simply sensible to create our initial automation before anything else. The automation profile will include the two emails and single SMS created earlier in the 'Getting Started' section. The automation schedule may be altered at any time, but we require a single schedule to get started.
Ignore the Partner option for the moment.
Pictured: Create a name and short description for the automation schedule. The automation profile will include the two emails and single SMS created earlier in the 'Getting Started' section. Define the email where a notification will be sent and an optional webhook (advanced). Note that every broker in your organisation may have their own referral form, so each form may include a different notification email (this email will be sent from the broker's own email and include their own email signature etc).
When the automation schedule is populated, click 'Save' (you may edit and review this later if required).
Step 2: Create Automation Schedule
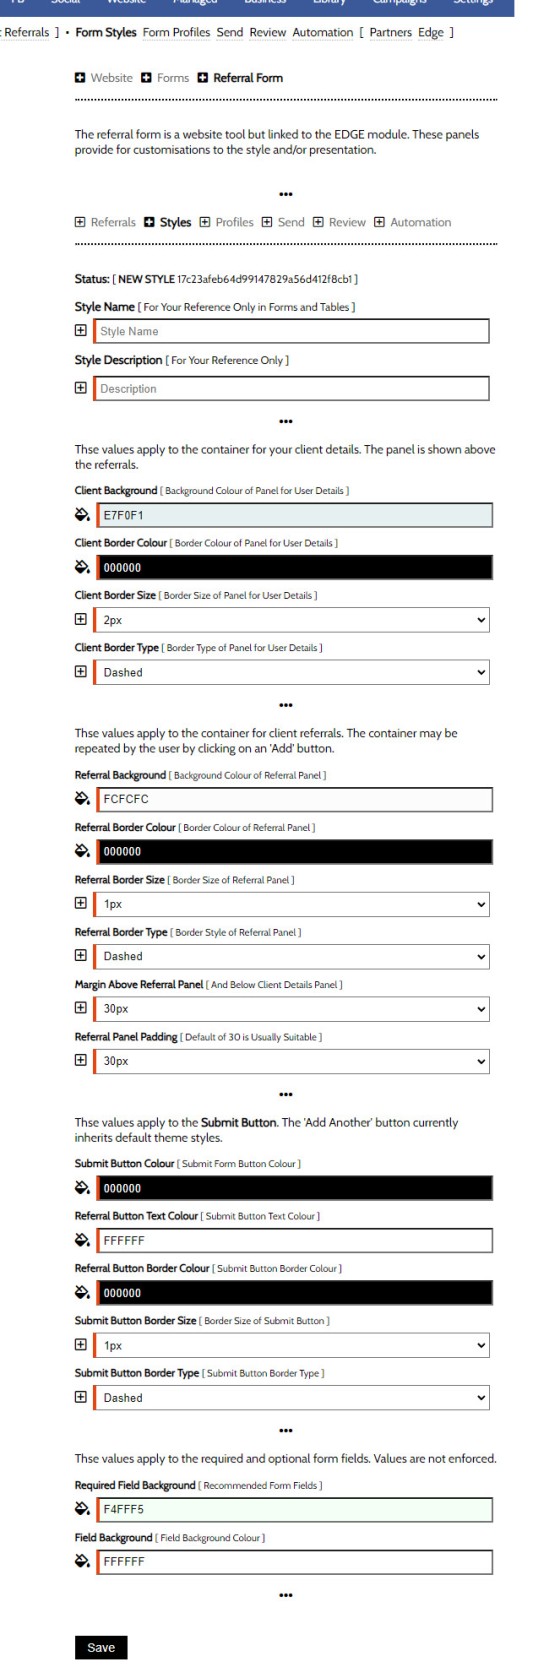
Create a basic style profile via the 'Style' panel. For starters, you may simply give a name and description to the values that are populated in the form by default. Perhaps you should name this 'Default Referral Style' so it's easily identifiable in the future. This will take no more than a few seconds.
Pictured: Create a basic style profile via the 'Style' panel. For starters, you may simply give a name and description to the values that are populated in the form by default. Perhaps you should name this 'Default Referral Style' so it's easily identifiable in the future.
Click 'Save'.
Step 3: Create Form Profile
The Form Profile includes all the text included within the form, the declaimer block reference, and the automation schedule. For starters - and assuming that we've created the Disclaimer Block and Automation Schedule as recommended - you should give your profile an easily identifiable name and description, and click 'Save'. Ignore the option for custom fields and the 'Redirect' for now - we'll describe these field options in a moment.
Pictured: The Form Profile includes all the text included within the form, the declaimer block reference, and the automation schedule. For starters - and assuming that we've created the Disclaimer Block and Automation Schedule as recommended - you may alter only these two values (you can come later to edit). Give the profile an easily identifiable name and description, and 'Save'.
Now we have created the necessary style and profile, we should send our data to the applicable website.
Step 4: Send Data to Your Website
The Referral Profile sent to your website is comprised of a profile and style. If the style/profile combination you are sending already exists, it will be overwritten, and all existing website records will be updated in the same action. The name assigned to the profile/style pairing will be that used in Elementor, and the resulting combination record ID will be used in shortcode (although it's Elementor you'll use most often to position your form).
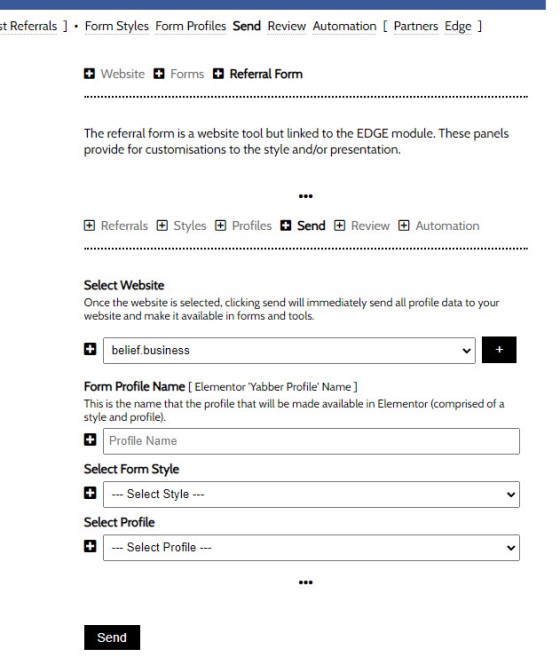
From the 'Send' pane you should first, select your website, and then assign a style and profile. The record will immediately be made in Elementor.
Pictured: From the 'Send' pane you should first, select your website, and then assign a style and profile. The record will immediately be made in Elementor.
Placing the Referral Form with Elementor
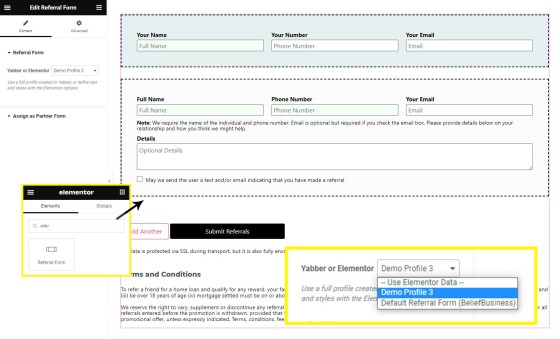
The most common method of placing a Referral Form on any page is with the Elementor Widget. Search for 'Referral Form' in Elementor, drag the block onto a page, and select the Profile created earlier (the profile/style pairing). Publish the page and you're done.
Pictured: Search for 'Referral Form' in Elementor, drag the block onto a page, and select the Profile created earlier (the profile/style pairing). Publish the page and you're done.
When searching for your desired profile, the first option will read '-- Use Elementor Data --' - this is an option that you do not want to select. If using Elementor data, we inherit style data from the Elementor block, and no automation will be applied. The Elementor style option is generally reserved for those without Yabber access.
Using Elementor Styles with No Automation
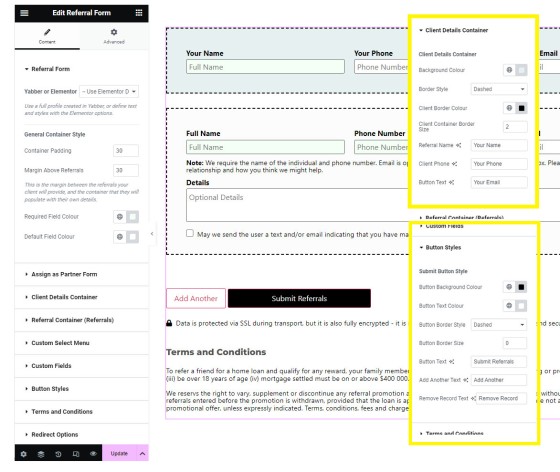
If you do use Elementor style options (and you shouldn't), a number of options will be shown when '-- Use Elementor Data --' is selected (as described above).
Pictured: If you do use Elementor style options (and you shouldn't), a number of options will be shown when '-- Use Elementor Data --' is selected (as described above).
Those without Yabber will simply receive a single email notification from the BM Support email.
Your Referral Dedicated Page
On all website installations above 2.2, the standard URL for your Referral page is as follows:
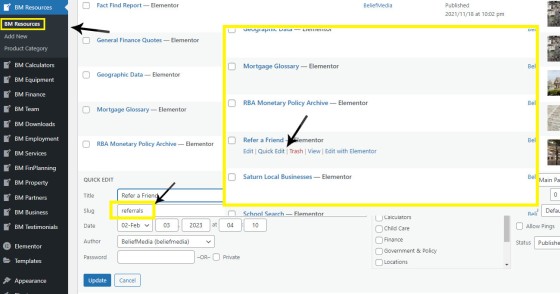
Pictured: If you are required to create the page on an older framework, you should include the page in the 'Resources' post type menu, and you should ensure that the page slug is set to referrals - this is important. Edit the actual page in Elementor as introduced earlier.
By default we'll deliver each product with the Referral Form in the 'Resources' main page menu.
Custom Fields
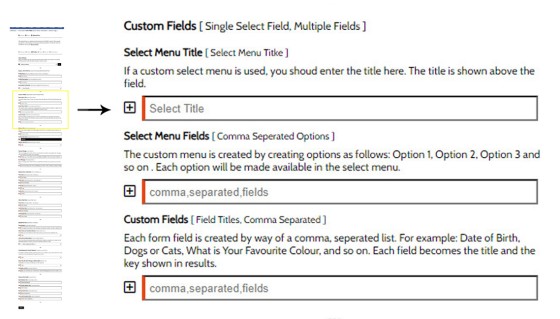
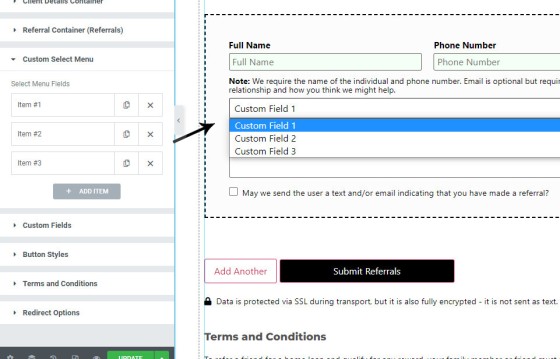
The form includes fields for yoru referring client to populate. These fields are simply name, email, phone, and 'More Information'. We've made it easy to facilitate a conversion of some type, but you may add additional fields if required. Given the simplicity of the form, we've limited the additional fields to a single select menu but multiple text fields.
Pictured: Custom fields in the Referral Form. The select options should be entered into the text field as comma,separated,values, while the additional text fields should be entered in the same way (with the exception that they'll render as text fields).
If using Elementor, custom fields are created individually.
Pictured: Referral Form Custom Fields in Elementor. There are two mmenus: one for the select menu and another for text fields.
Partner Referral Forms
Having a custom referral form contributes to your expertise and authoritativeness, and carries significant value when dealing with a potential partner. In company with our partner article system and other partner tools, the presence of the form alone will elevate your experience and make you stand out when compared to your competitors.
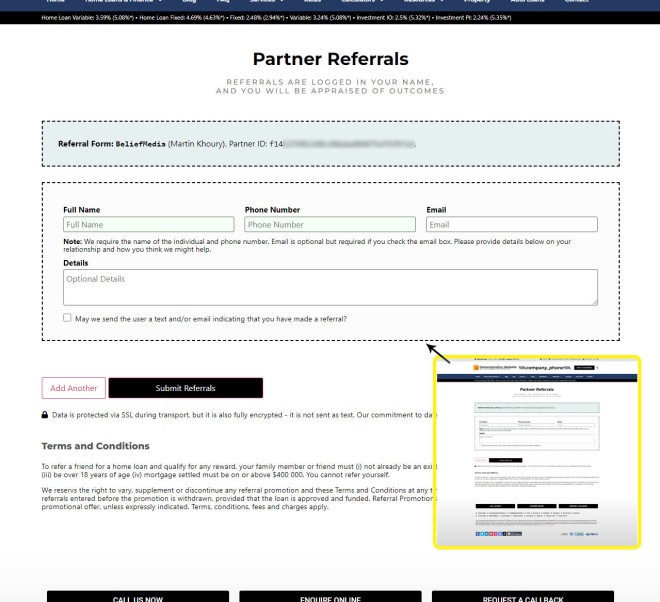
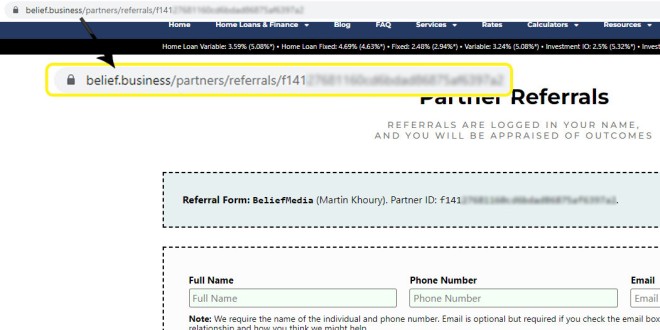
The partner form is accessed via a discreet URL specific to that partner. Visitors to that page will be met with a title of the Referring Partner (such as 'XYZ Accounting'). The form won't always be used, but there are partners that see value in it.
If you're using our Partner Dashboard, or website-based partner login, those referrals made by the partner are returned to a page.
Pictured: The partner referral form is identical to the standard referral form with the exception that - if accessed via the partner form URL - it won't require the user add their own details. The partner ID is submitted with the form and integrated with the partner system (if enabled and used). There a likelihood that partners will want to supply additional information, and this is made available via custom form fields.
The partner form integrates with our email marketing system, so if you're sending out an email to your partner list a single placeholder is used to direct the referral partner to their referral page.
Pictured: Accessing a specific partner form via a dedicated URL. The partner_id shown is the partner_id created in Yabber. Partner details are obviously sent with the form, and all details are integrated with other partner systems.
■ ■ ■
Related Form FAQs
Your website includes the most comprehensive form system in the industry. Some of the form features are listed below.
Your website includes a very large number of methods to include different types of headings, including Titles and Statements (both of which serve a specific purpose), with other shortcode and Elementor tools making the addition of various 'headings' a piece of cake. While there are any number of ways to generate page titles,… [ Learn More ]
The Fact Find form on your website contains only a few questions, and the questions asked are used to determine LVR and LMI so a PDF Report may immediately be sent to the user. During the top-of-funnel subscription process, no question should be asked, no mouse movement or scroll should be required, and no action… [ Learn More ]
In the Formly FAQ where we detailed how to create a subscription form, we introduced the concept of placeholders, or those pieces of text that are dynamically replaced with another piece of text when an email is sent. This simple feature allows you to use templated designs with dynamic user content. While the amount of… [ Learn More ]
The nonconforming business finance form was created for a single client, although it'll be made available to those that they may partner with in some way, and a 'version' of this form will be made available in the standard plugin (and client website). The form comes at a time when a very large number of… [ Learn More ]
The version 0.8.9.2 release of the Yabber website plugin includes a new for field that accepts an ABN or Company Name and returns a list of matching results. Included by default in various ways in the 202410 version of the website framework, and integrated directly into our Formly Module, the tool should be used when… [ Learn More ]
This FAQ will show you how to validate the mobile phone number associated with any subscription form on your website. If the feature is enabled, a user will be required to enter a 4-digit code that is immediately sent to the supplied mobile number. Once the correct number is supplied, the form will immediately submit… [ Learn More ]
One of the marketing magnets any Property or Finance operation will use to engage organic traffic and convert warmer traffic in higher numbers is the inclusion of a Property Report form that will result in a report provided to the user. This FAQ will introduce the Property Report and how it is applied on pages… [ Learn More ]
In most cases, the idea with any 'cold' form is to render as few fields as possible and only ask what is absolutely necessary to attract a user into your funnel. Certainly, if a user has ever subscribed to a form and comes back to your website, those fields that are known, such as name… [ Learn More ]
There are times when you would like a form to take shape as a single line. This may be useful in a website footer, inline in content, or in other locations, and the format is very different to the default line-by-line format that is applied by default for vertical forms  and Simple Panels
  .… [ Learn More ]
The First Email is an action that will conditionally send the first email to a user after a subscription of any type based on their form interaction. The First Email sent to a user will be determined based on the nature of their subscription - are they a subscriber, phone contact, or calendar booking? A… [ Learn More ]
A Conditional Redirect is simply an action that will send a user to a different second page after subscribing to a form. The second page shown to a user will be determined based on the nature of their subscription - are they a subscriber, phone contact, or calendar booking? A single page may be used… [ Learn More ]
Your website supports a large number of our own in-house search tools that exist outside of the standard WordPress framework. This FAQ will introduce the 'BM Website Basic Search' search facility onto your website with shortcode or with the Elementor widget. Searching any website can be a nuisance, and the experience is one that can… [ Learn More ]
In a previous FAQ we looked at how to include an address validation field into a form on your website. This FAQ will introduce the same style of field that will automatically direct the user to the single page associated with each registered address in Australia. This feature is part of the broader Property… [ Learn More ]
Version 0.8.8.2 of the Yabber Website Plugin in company with website framework 202406 updates includes a basic Emergency Services search engine. The search engine will return various services based on suburb and/or postcode and then redirect the user to a dedicated page. The feature is available with a shortcode and Elementor widget - this FAQ… [ Learn More ]
The Property Property Streets API, and the Validation Endpoint in particular, is a means to access registered street and registered address location from Yabber via a form input field. The Validation (or Autocomplete) endpoints are useful for searching property on user keystrokes. The validation may be used to ensure pinpoint accuracy is assured by way… [ Learn More ]
In an FAQ titled "How to Create and Manage Website Simple Panels in Yabber" we looked at how to create Simple Panels, with the panel providing the side-by-side form and lead magnet (image or video). This FAQ will look at the various options to place the Simple Panels on your website.
Note:
A simple panel is simply a two-column form. On the left side we have a form, and on the right side we have an image or video. As you're aware, we espouse the every-page conversion methodology, and this requires a high-value and relevant lead magnet (or 'offer') on every single page of your website. Every… [ Learn More ]
Forma And Panel escalation is a component of the large Conditional Content framework that underpins your mortgage broker website and finance funnels. Basic conditional content features are introduced in an FAQ titled The Basics of Conditional Content and Interest Types, while advanced methods are addressed individually. One of the simplest conditional options to employ… [ Learn More ]
Your website forms made available in Yabber and on your website are one of the most important marketing assets in your toolkit. They're the conduit that connects your website to Yabber and triggers the applicable automation schedules, logs the lead or prospect, and provides you with relevant notifications. Integration is made with various CRM systems,… [ Learn More ]
Your website's Referral Form is a dedicated resource with its own features and automation schedule. Managed via Yabber and an Elementor block or shortcode, it may be applied anywhere on your website. It is expected that the form will be integral to your formalised referral, partner, and EDGE post-settlement/repricing programs. You will find the 'Referral… [ Learn More ]
Every page of your website requires either a form or simple panel - we know this. This FAQ will details how to assign your created forms and panels to various 'hooked' locations on your website, and how to create Custom Locations anywhere on your website with Elementor (or WordPress shortcode). Assigning forms to various locations… [ Learn More ]
A Simple Panel is a form and 'something' alongside it, such as an image or video. In this FAQ we will look at how to change the Simple Panel as shown on the front page of your website.
Navigate your way to Yabber's 'Front Page' module… [ Learn More ]Finance Partner FAQs
FAQs related to the vast array of Partner Features.
In a previous FAQ titled "How to Add and Manage Partners in the Partner Module" we looked at how to create and manage Partners, all of which were assigned a primary 'folder' and multiple partner categories. In this article we'll look at how to send a text message to these partner groups. The SMS… [ Learn More ]
Your website's Referral Form is a dedicated resource with its own features and automation schedule. Managed via Yabber and an Elementor block or shortcode, it may be applied anywhere on your website. It is expected that the form will be integral to your formalised referral, partner, and EDGE post-settlement/repricing programs. You will find the 'Referral… [ Learn More ]


