You may update your website primary logo quickly and easily via Yabber. The system supports two other primary functions: seasonal logos; and conditional logos. A seasonal logo will swap out for a period of time as defined by you, and a conditional logo will show based on the resolved borrowing objective of a user.
Uploading Logos
To upload a new logo, or replace your logo with another in your logo library, navigate your way to the 'Logo' panel via the 'Front Page' module (within the 'Website' module). Your logo should ideally be 550 x 80 pixels (550 px width and 80px height). It may be larger, but should ideally match those dimensions exactly.
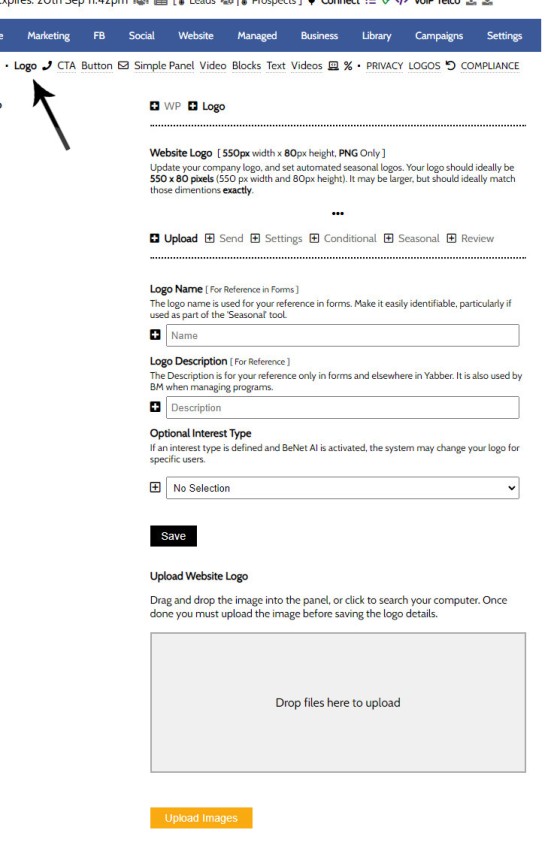
Upload the logo first via the drag-and-drop lower panel, provide your logo with a name and short description, and save. Specific errors will be returned if image dimensions are unacceptable. The image must be a PNG image.
Pictured: Upload the logo first via the drag-and-drop lower panel, provide your logo with a name and short description, and save. Specific errors will be returned if image dimensions are unacceptable. The image must be a PNG image.
As many images may be uploaded as required.
Updating Your Website Logo
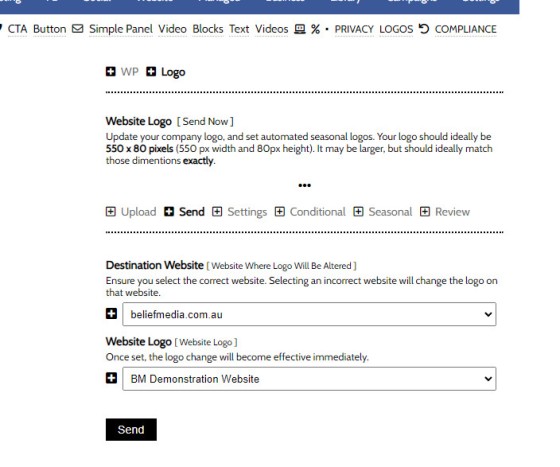
Yabber is a multi-website system, so you should send your logo the appropriate website. Select your website and logo, and send. The change becomes effective immediately.
Pictured: Select your website and logo, and send. The change becomes effective immediately. All references to your website logo are altered.
If you have an older framework where this feature does not function, you may replace your existing logo in WordPress to reference the following image URL:
Pictured: You may update older frameworks by simply altering the URL referencing the image logo. If the logo does not immediately show, update your logo from within Yabber. You will obviously replace https://belief.business with your own website address.
Copy the sample URL as a reference:
Referencing the above URL is the only change required to enable this module in full.
Seasonal Logos
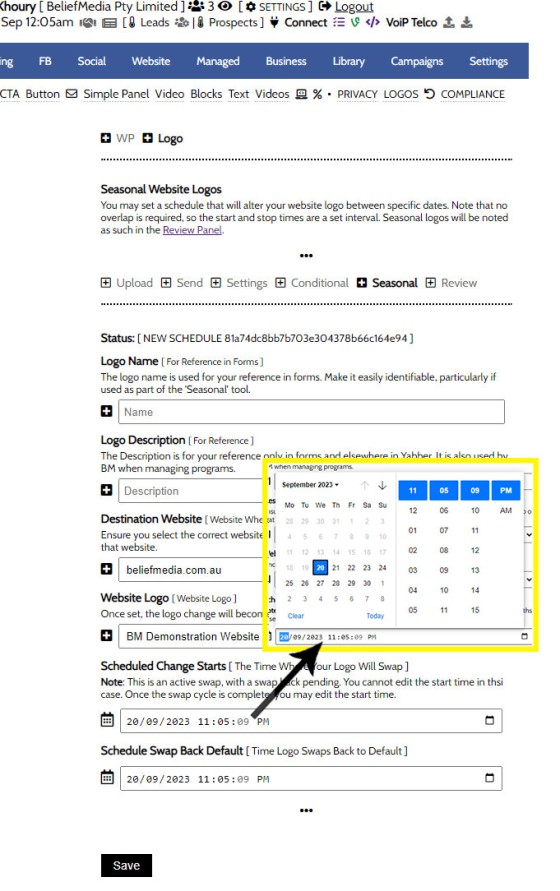
A seasonal logo will show for a defined period of time, such as over Christmas, or Anzac Day. You should give your schedule a name and description, define the website and logo, and then define the period you would like the logo to replace your primary logo.
Pictured: You should give your schedule a name and description, define the website and logo, and then define the period you would like the logo to replace your primary logo. We are required to know which logo to switch back to, so we should define our 'default logo  ' in the Settings tab.
You may set as many logo swaps as required.
Conditional Logos
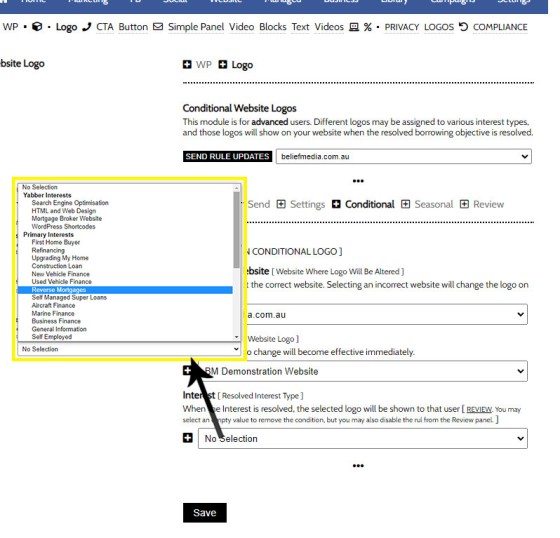
Conditional logos are advanced, and they form part of the broader conditional experience made available from within the broker website framework. You may assign a logo to any interest type, and if that interest type is resolved (borrowing objective), the alternate logo will render.
Pictured: You may assign a logo to any interest type, and if that interest type is resolved (borrowing objective), the alternate logo will render.
Conditional rules will have to be updated when they're created via the 'Update' button on the same panel.
Review and Edit
You may review logos, edit, and modify via the 'Review' panel.
■ ■ ■
Related Front Page FAQs
Related FAQs and features relating to your website front page.
Your website includes a very large number of methods to include different types of headings, including Titles and Statements (both of which serve a specific purpose), with other shortcode and Elementor tools making the addition of various 'headings' a piece of cake. While there are any number of ways to generate page titles,… [ Learn More ]
Your website will be delivered with a large number of menus. Your header and footer may be altered to your liking, but usage of Yabber's header and footer elements are recommended to ensure that you're able to quickly and easily apply our agile methods when a menu item requires changing. The primary navigation menu in… [ Learn More ]
We generally advocate for brokers to position themselves in various ways by way of standalone websites that have a defined siloed audience and serve a very specific purpose. However, managing multiple websites can be problematic for a number of reasons, with duplicate content and time requirements probably topping the list. If managed correctly - and… [ Learn More ]
The Lender Widgets on your website are one of your most powerful website features. Despite the ubiquitous industry rhetoric suggesting that sharing rates will only attract 'rate chasers' (partially true, but outside the scope of this FAQ), the rate information shared on your website will objectively attract and convert more mortgage clients. Used in company… [ Learn More ]
The Lender Widgets on your website are one of your most powerful website features. Despite the ubiquitous industry rhetoric suggesting that sharing rates will only attract 'rate chasers' (partially true, but outside the scope of this FAQ), the rate information shared on your website will objectively attract and convert more mortgage clients. Used in company… [ Learn More ]
In order to represent your panel of lenders on your website, most brokers will use a silly slider of static images, and others will use a single fixed image comprised of multiple images - just a lazy solution. Your website includes a grid of images that links to the application Lender Archive Page that'll… [ Learn More ]
There's a Rate Ribbon on the front page of your website below the centre-fold block that presents the lowest rates of various types. The purpose of the ribbon is to position yourself as a broker, showcase your digital expertise, and create early funnel pathways. Each rate shown in the ribbon links to the relevant
The single line rate bar is shown on the broker website framework by default as part of the header and in the centre of the front page. The purpose is to position yourself as a broker, differentiate yourself from the 'others', showcase lowest available rates from your accredited lenders, and create website pathways. This FAQ… [ Learn More ]
The testimonial module is the most versatile in the finance (or any other) industry. We suggest you use it and take full advantage of the system. The Testimonial module will perform the following functions: Automatically pull reviews, testimonials, and recommendations from a growing list of services. The system will publish each review to all of… [ Learn More ]
The footer disclaimer is shown in the footer of your website on every page. It is not to be confused with the required privacy, terms, and disclaimer standalone pages  . A default footer disclaimer will apply if a personal disclaimer is not sent.
The Result
The result of the default footer disclaimer is shown below.… [ Learn More ]Website footer logos comprise of two blocks: industry logos, and social links. Social icons may be rendered in any number of ways but it's expected that they'll be in the footer as there is where website visitors go looking for them. You may update logo and social links at any time.
The Result
The result… [ Learn More ]By default, two 'Announcement' blocks may be assigned to your front page, although you may add more if required. This FAQ assumes that you have an understanding of Statements, and at least one Statement is created. Read the Statement FAQ here. By default, two Statement blocks are assigned to the front page: an upper… [ Learn More ]
We encourage multiple videos on your front page, and they should be presented in multiple ways. The front page video panel is shown (by default) at the bottom of your front page. However, the block may be moved if required, and it may be used anywhere with the use of shortcode.
The Result
The result… [ Learn More ]We encourage multiple videos on your front page, and they should be presented in multiple ways. The primary front page website video is shown fully rendered, and by default it'll show about half way down the front page.
The Result
The result of the front page video is as you would expect (shown below).
The Front Page CTA Video Button is an optional button that presents alongside the two Primary CTA Buttons. The button simply launches a YouTube, Wistia, or other video in a popup modal. It supplements the videos that are expected elsewhere on your front page.
The Result
The result of the video button is as… [ Learn More ]There are two primary buttons made available in the top-fold primary CTA panel. These two buttons are styled to your liking and link to one or more of your Yabber assets. We recommend using both buttons.
The Result
The result of the two front page buttons - n our case styled in black and white… [ Learn More ]Website front page primary CTA text is defined in the 'Front Page' module within Yabber. Select the 'CTA' option, select your website, and define the text you wish to show on your website. Any submitted changes are immediately applied on your website. Related Website Article: "Managing Front Page Website Content Within Yabber". First, a… [ Learn More ]
You may update your website primary logo quickly and easily via Yabber. The system supports two other primary functions: seasonal logos; and conditional logos. A seasonal logo will swap out for a period of time as defined by you, and a conditional logo will show based on the resolved borrowing objective of a user.
Uploading… [ Learn More ]
Your primary and other website phone numbers are all included on your website with dynamic shortcode. Any phone number registered in Yabber will be available on your website in any location, and it may be updated at any time. This includes the phone number in your primary website header. Numbers are updated globally, meaning that… [ Learn More ]


